I tend to find I learn skills best by doing. In light of
this, I intend to start this section immediately with an example - as an exercise. In this
example, I intend to produce a simple cube with the letter "A"
indented on it. Files related to this tutorial are available on the previous
page ("Up" in the navigation bar above).
-
Open Blender and create the following scene; this scene makes a
good starting point for many textures:
-
Clear the default cube.
-
M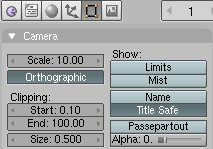 ove
the camera to X: 0, Y: 0, Z: 8 (the Z axis one isn't critical here). Set
all three rotation values to 0.
Make it an orthographic camera with a nice scale number (e.g. 10). This
is done in the edit buttons. ove
the camera to X: 0, Y: 0, Z: 8 (the Z axis one isn't critical here). Set
all three rotation values to 0.
Make it an orthographic camera with a nice scale number (e.g. 10). This
is done in the edit buttons.
-
M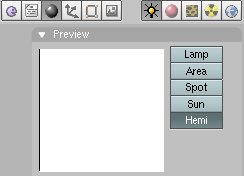 ove the lamp to 0, 0, 0, and set
all three rotation values to 0. Set the lamp's type to Hemi. To do this, go to the Lamp Materials buttons, and select the
option "Hemi". ove the lamp to 0, 0, 0, and set
all three rotation values to 0. Set the lamp's type to Hemi. To do this, go to the Lamp Materials buttons, and select the
option "Hemi".
-
Set the world texture's HoR, HoG and HoB to 1. You could
also set this to 0, if you wanted the background to the texture to be
black.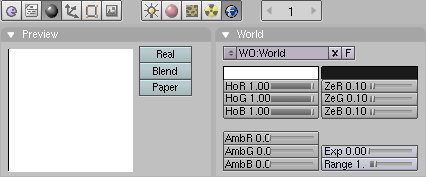 Actually, any colour could be used, white is just easier (especially for
this example).
Actually, any colour could be used, white is just easier (especially for
this example).
Add a text object, and change it as follows:
-
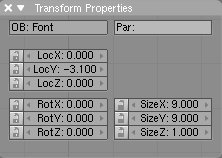
Change the scale, rotation, and location as below:
-
C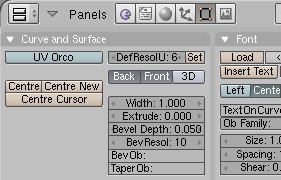 hange the font and curve settings as
below. These settings are designed to give a thick black line at the
edges. Although this could be achieved in other ways, this one works and
seems relatively efficient. hange the font and curve settings as
below. These settings are designed to give a thick black line at the
edges. Although this could be achieved in other ways, this one works and
seems relatively efficient.
-
Set the material of the text as below. This material is
designed to give that strong black line. As an extension task, you could
try tweaking these settings to see what gives a good effect.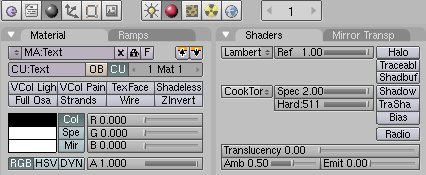
Now we are ready for the step of rendering the texture.
This step is, largely, your choice. Now would also be a good time to save
your work! For this tutorial, you can simply leave the settings as default.
After rendering the scene (F12), press F3 and save the image. Make sure you
specify the correct file extension. There are, however, a few things to bare
in mind:
-
Is the texture going to be viewed quite close? If so,
you might want to consider rendering at a higher resolution. Also,
increasing the oversampleing to 16 is a way of improving the texture's
quality without drastically increasing the rendering times of scenes
using that texture.
-
How is compression going to affect the texture? It is
probably better to use a lossless format like a bitmap, or Targa. As a
general rule of thumb: "Unless you have a dire space limitation,
you should always leave lossy compression until last."
This is to provide the compressor with the best possible source, and
applies to other tasks too, for example, video editing.
-
Do you really need things like raytracing, shadows and
radiocity?
-
Do you want to render the alpha channel (for transparent
areas of the texture)? If so, then choose a file type that
supports an alpha channel, for example, Targa. Note: The alpha channel
can be used to prevent blender from using a certain area of the texture
(for example, if you wanted to texture an oddly shaped image onto
another surface without affecting the shape's surroundings).
-
Can you use a square texture, or is there a specific
need for a rectangular texture?
-
This last step involves using the texture. For this simple
example, The textured object is a cube. After saving your previous work,
start a new file. The default scene (in Blender version 2.41) includes a
cube. As this is a texturing tutorial, and not a lighting or composition
tutorial, I only intend to show you the steps for texturing the cube. If you
need more, please feel free to look at the sample files for this section.
-
Select the cube and ensure there is a material on it. If
not, create one.
-
Go to the "Texture" panel of the materials
buttons and add a texture if none already exists.
-
In the texture buttons, change the texture type to
"Image". Click "Load Image" and select the texture
you rendered earlier.
-
G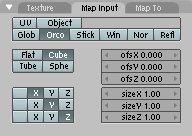 o
back to the materials buttons and set the "Map Input" options,
changing the map type from "Flat" to "Cube", as in
the screenshot. o
back to the materials buttons and set the "Map Input" options,
changing the map type from "Flat" to "Cube", as in
the screenshot.
-
C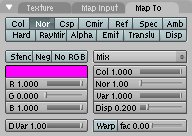 hange
the "Map To" options as follows. These options give an
indented effect on darker patches of the map. Note the change in
selection from "Col" to "Nor", and the value of the
"Nor" slider. Hint:
If the "Nor" button turns even darker and changes to use
yellow text, you should see the opposite effect to the button's usual operation.
Also, ensure "Full Osa" is enabled. This control is located
just above the colour controls for the material (as opposed to the
"Map To" colour). hange
the "Map To" options as follows. These options give an
indented effect on darker patches of the map. Note the change in
selection from "Col" to "Nor", and the value of the
"Nor" slider. Hint:
If the "Nor" button turns even darker and changes to use
yellow text, you should see the opposite effect to the button's usual operation.
Also, ensure "Full Osa" is enabled. This control is located
just above the colour controls for the material (as opposed to the
"Map To" colour).
Experiment with these options to see what effects you can make.
Can you make the letter look burned, for example?
-
T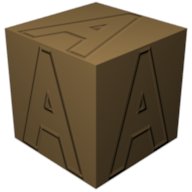 he
final step is rendering. If you want your scene to look like mine,
download the sample files and look at the colour, reflection, light
position and rotation, camera position and rotation, and the camera's
"lens" value (the same control as the scale value). As with
stage 3, rendering options are quite dependant on what you want. Make
sure you save your work, too. he
final step is rendering. If you want your scene to look like mine,
download the sample files and look at the colour, reflection, light
position and rotation, camera position and rotation, and the camera's
"lens" value (the same control as the scale value). As with
stage 3, rendering options are quite dependant on what you want. Make
sure you save your work, too.
|

